MPEGBOX 12 Volt DC-DC |


- Overview:
- This shutdown controller is used for
people who use ATX motherboards in their car. The idea was thought up
by some of the people on www.mp3car.com. The basic idea is as
follows:You have a computer in your trunk, you don't want to have
to push the power button or worry about shutting down the computer
correctly. This unit goes in between the cars 12-volt electrical system
and a power inverter or to a DC-DC ATX power supply. After a fixed
amount of time after the cars ignition goes off, the unit will "push
the power switch" and that will tell the computer to shutdown. After
that, it will kill all the power to the computer so that it doesn't
drain your battery. When the car comes back on (you set your BIOS to
boot after power loss) your ready to go again.
Note: When you first power on the shutdown controller it has to go through a complete cycle. It may appear that it is stuck in the on position, but if you wait for the timers to charge up to their operating voltages, the device will behave like expected. To verify, turn R2 to the minimum time, short jumper J1 and wait a few seconds. The device should turn off.
- Features:
- Saves Battery Life
- Convenient Automated Control
- 25 Amp Max Load Current
- Load Dump Protection
- Reverse Voltage Protection
- Adjustable Timers
- Optional Kill Switch Connector
- Operation:
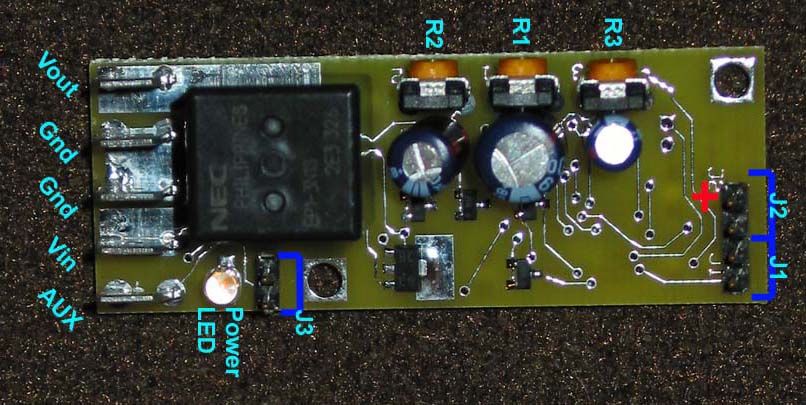
- Time to Pulse (R1): This is a dial on the unit that will let you set the amount of time it waits to send the "atx power pulse." When power to the ignition line goes low, the unit will wait this amount of time. This time is adjustable and is typically 47 seconds - 9 minutes (or 0 with kill switch.) Clockwise is less time.
- ATX Pulse Length (R3): This is a dial on the unit that will let you set the amount of time it asserts the "atx power pulse." You can set it up to effectively push the power button for .5-5 seconds. Clockwise is less time
- Time to Kill (R2):. This is a dial on the unit that will let you set the amount of time the unit waits to kill all power to the computer after the ATX pulse has been signaled. Basically after the pulse that simulates the power switch press, the computer should power it's self down, then you just want to make sure that functions like "Wake on Lan" don't kill you battery.. Therefore after this timer, the power is pulled by opening the relay. This time is adjustable and is typically .5 seconds to 110 seconds. Clockwise is less time
- ATX Power Switch (J2): This jumper goes to the power switch on a typical atx motherboard. The - side is just ground and the plus side (pin 1) is the signal path. To figure out which one is plus and minus, use a volt meter and check to see which pin has 5 volts on it. That is the signal. when you hit the power switch, you basically connect that wire to ground and that is what this controller does to generate the "ATX Pulse Length" which is set at (P3). This is also useful if you want to turn the computer on manually and not set up the BIOS to "always power on after power loss." A momentary switch can be wired up in parallel with this jumper to bypass the shutdown controller for what ever reason.
- Optional Kill Switch (J1): To set the "Time to Pulse" length to 0 seconds, short this jumper by connecting a momentary switch. This will immediately send the atx pulse and then initiate a "time to kill" thus killing power to the computer.
- Optional Aux Connection (J3): To Connect a toggle switch here if you don't want the computer to come on with the ignition. Instead it will come on with the switch. DO NOT CONNECT THE AUX WIRE if you use this feature.
- Power LED: Green LED to indicate that the relay is connected and the computer is on.

-
Specifications: Input Voltage 6-25 volts DC +12 Ignition threshold ~8 volts DC Relay Switch Current 25 Amps Max Operating Current "Relay On" ~80 mA Operating Current "Relay Off" ~3 mA
Recommended Supplies:
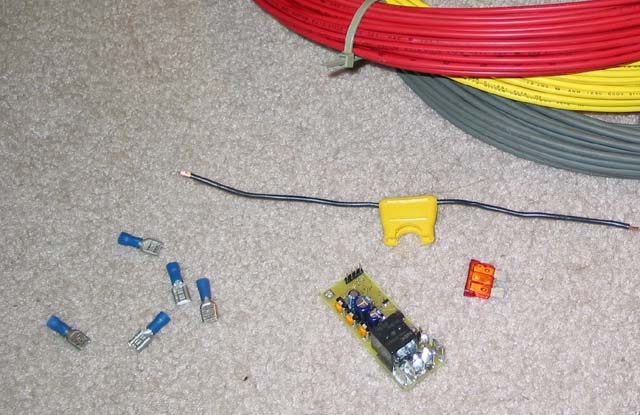
In the picture below there is some 12 gauge wire,
crimp connectors, a fuse holder and the shutdown controller. The Fuse
shown is 10 amps. Depending on your system you may want to buy a larger
fuse. All of the wiring accessories are
available at any auto parts store.

Mounting:
There are two mounting holes on the shutdown controller, It
can be bolted to any chassis using
screws. Make sure the traces are not shorted out to any metal. The
other option is to enclose the device in ~1 inch diameter heat shrink
tube and secure the device to other cables in the system.
Ordering:
If you would like to purchase a shutdown controller please go
through my PayPal Shopping Cart. You can pay with a credit card through
PayPals secure site or with money in your PayPal account. Shipping is
included in the prices below for US and International orders. Fuse,
connectors, and wire are not included. I highly recommend using a fuse
and 12 gauge wire. This device should be installed with someone with
electronics experience. By ordering a device from this site you
acknowledge that I shall not be held responsible for damages, direct or
indirect, for the use or misuse of this device.
This shutdown controller is no longer available. It's replacement is however. Contact orders@mpegbox.com or visit www.mp3car.com to purchase the new micro Shutdown Controller. uSDC20D
The author of this page is not responsible for any damages caused by someone following the procedures listed above.
This page is presented for entertainment purposes only. All claims are made from experience and are not necessarily fact.
Various trademarks on items are the property of their respective owners.
Send comments or corrections to: Jeff Mucha
©2001 Jeff Mucha. All Rights Reserved.
